Using tree data structures to implement terminal split panes - more fun than it sounds
Kevin Yang
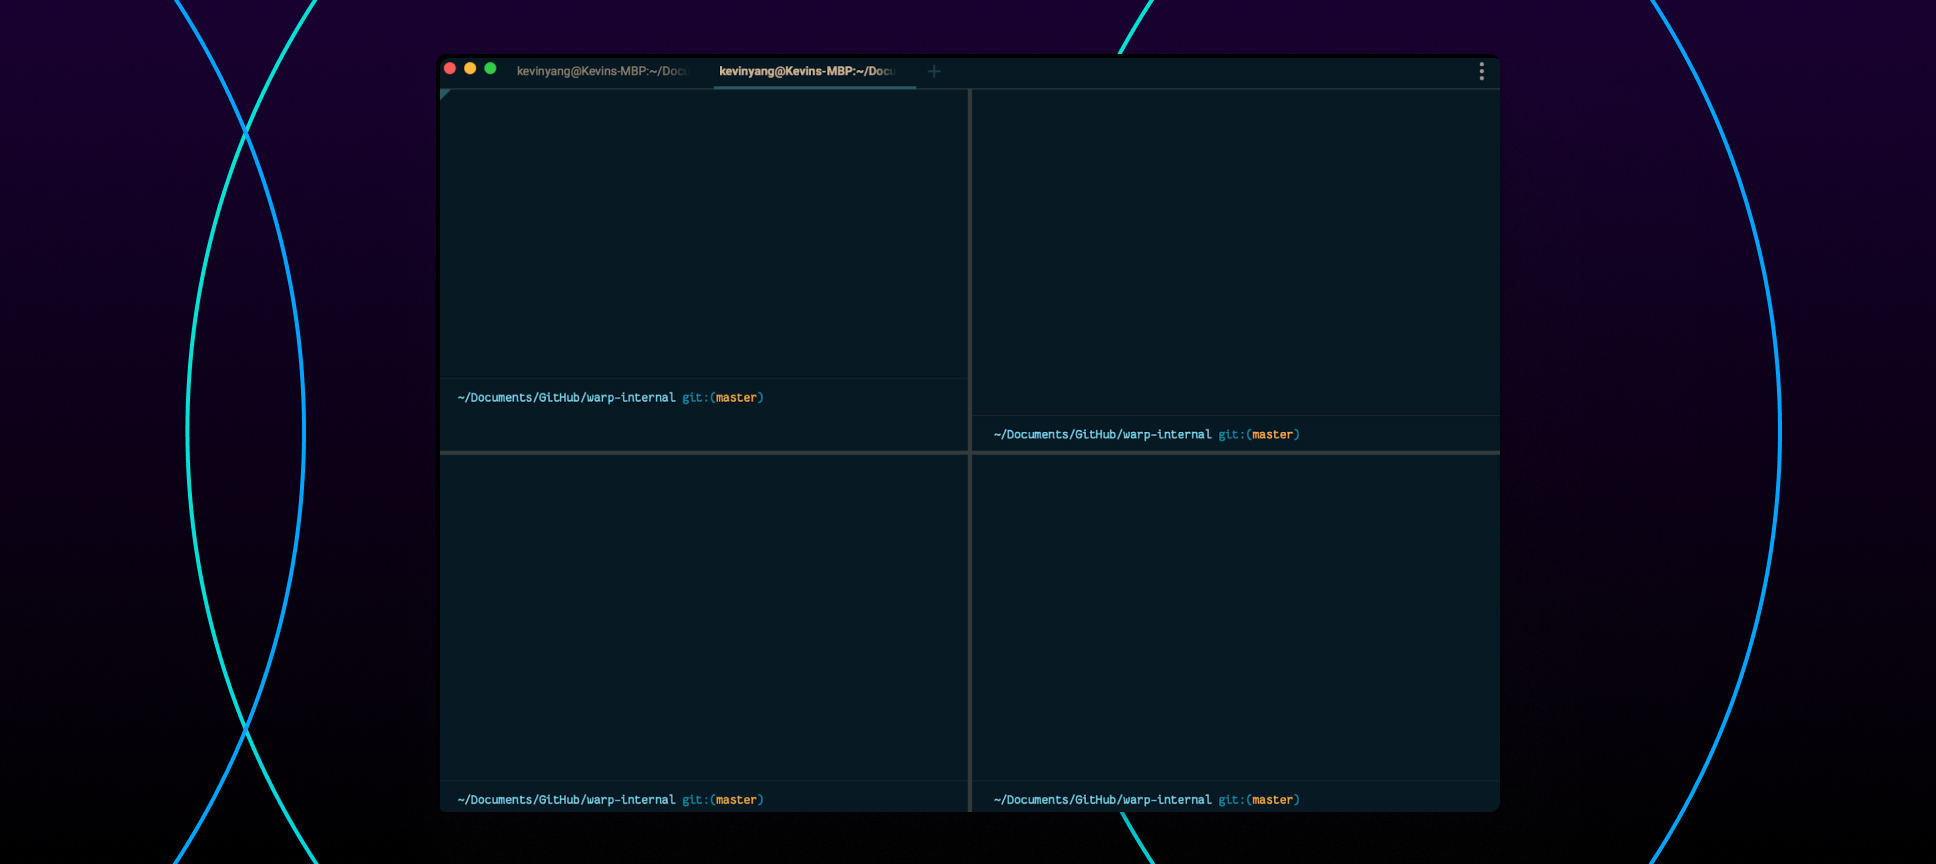
This is how we used tree data structures to build split panes in our terminal app.
Most popular command line tools and code editors like VSCode and Tmux support split panes: they provide a handy way for users to visually organize different workflows and keep track of processes that are happening in parallel. One of the first things I learned when doing web development was to have two panes – one for running the server and one for checking and pushing code to Github.
Using split panes is one thing; building them is another. I never thought I would need to build split panes from scratch until I joined Warp – at Warp, we are building a high-performance terminal written entirely in Rust.
As part of building it, we had to build native split panes. Here are our key product requirements. Developers should be able to:
- Infinitely split the screen in any direction (approximately).
- Remove panes from the screen.
- Navigate across panes with arrow keys.
- Arbitrarily resize panes.
Representing panes in a two dimensional array?
The first piece is figuring out what data structure to use to represent these panes. The first data structure that comes to mind to represent panes is a two dimensional array. Intuitively, it has some great properties we could take advantage of: for example, it captures how panes are laid out visually, so if we want to navigate in a certain direction, we simply need to change the row and column index to get the target pane. Pushing new panes is straightforward as well, we just need to either insert it into an empty cell or create a new row/column if the cell is currently occupied.
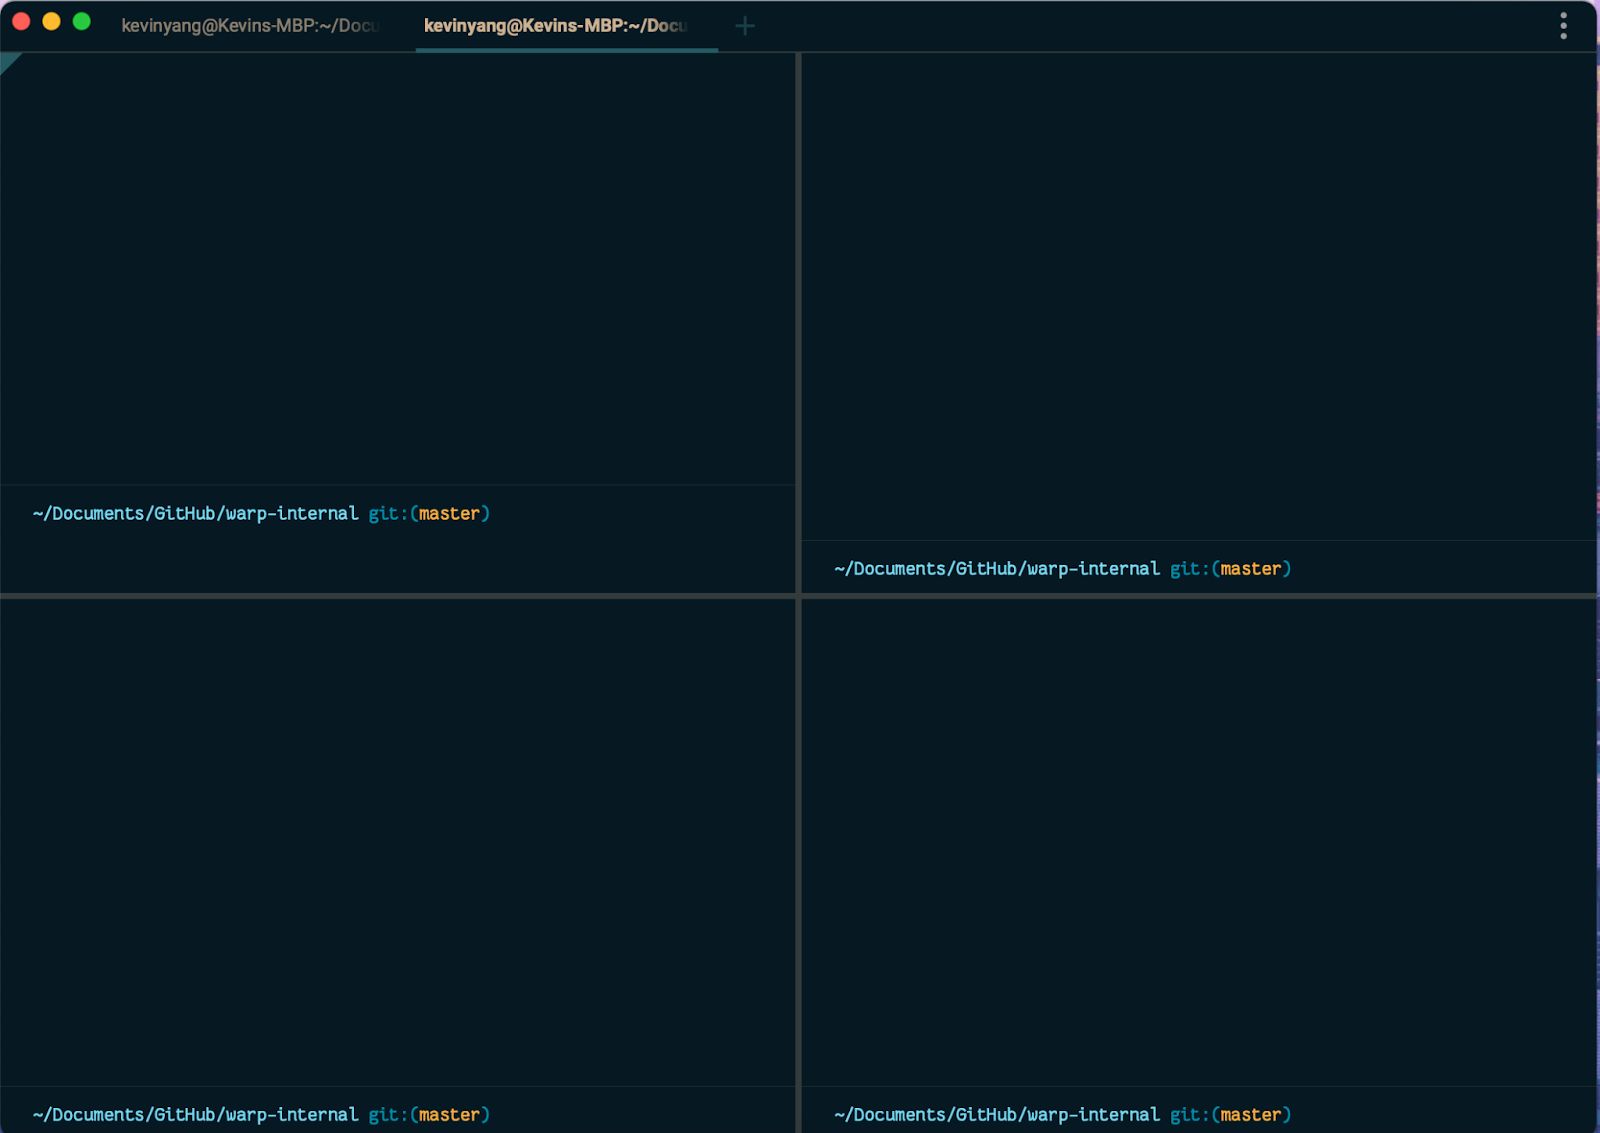
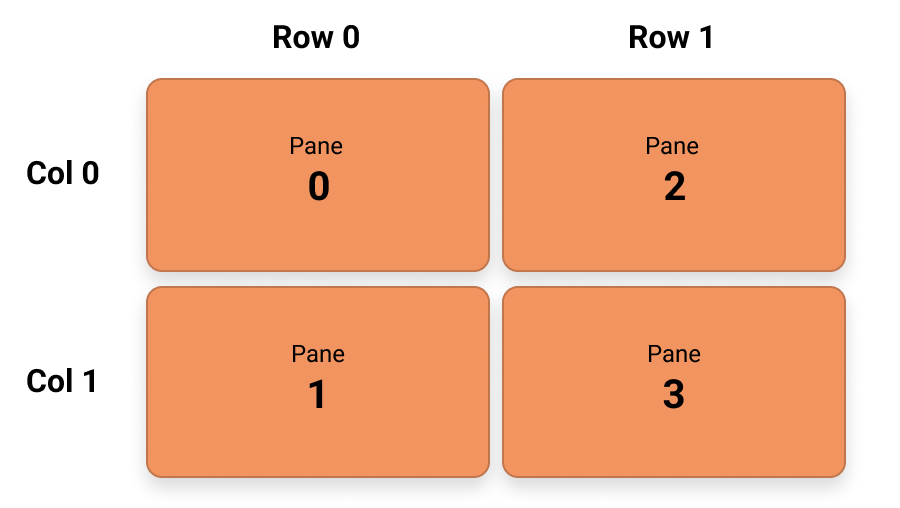
Figure 1: Example of a screen split into four panes and its representation with a two dimensional array.
Intuitive as it may be, we encountered some issues:
- Representation ends up becoming sparse:
Users should be able to split the panes in any arbitrary way – they could have two panes on row 0 and five panes on row 1. This will fill the two dimensional array with many empty cells. As a result, navigation becomes harder since simply increasing or decreasing the current cell's row/column index might lead to an empty cell. - Performance does not scale:
Inserting and removing panes could be memory expensive. For example, if we need to insert a new pane to the right of pane 0, we will have to allocate a new row and shift the content of every pane in the rows after. This will get increasingly expensive as users create more panes.
Representing panes with trees
The Zed editor (originally created by Nathan Sobo) provides an interesting approach: using trees to represent panes. Trees are well suited for this problem:
- Trees could be unbalanced:
This solves the obstacle we had when using the two dimensional array as we could split panes in any arbitrary way and still represent them efficiently in a tree. - Trees could be recursive:
We won’t need to worry about allocating an entire new row or column for each pane. Instead, we just need to insert a new branch when a user adds another pane. - Trees could be hierarchical:
We could represent the relationship between panes and their sub-panes with parent nodes and child nodes.
Each tree can have only two different types of nodes – a branch or a pane node. A pane node, as its name suggests, represents a pane on the screen. This should always be a leaf node within a tree. A branch node holds information about the spatial relationships between its children. In our use case, the branch node represents the direction a pane is split, which can be either vertical or horizontal. An example of how a snapshot of pane state could be represented as a tree is shown below.
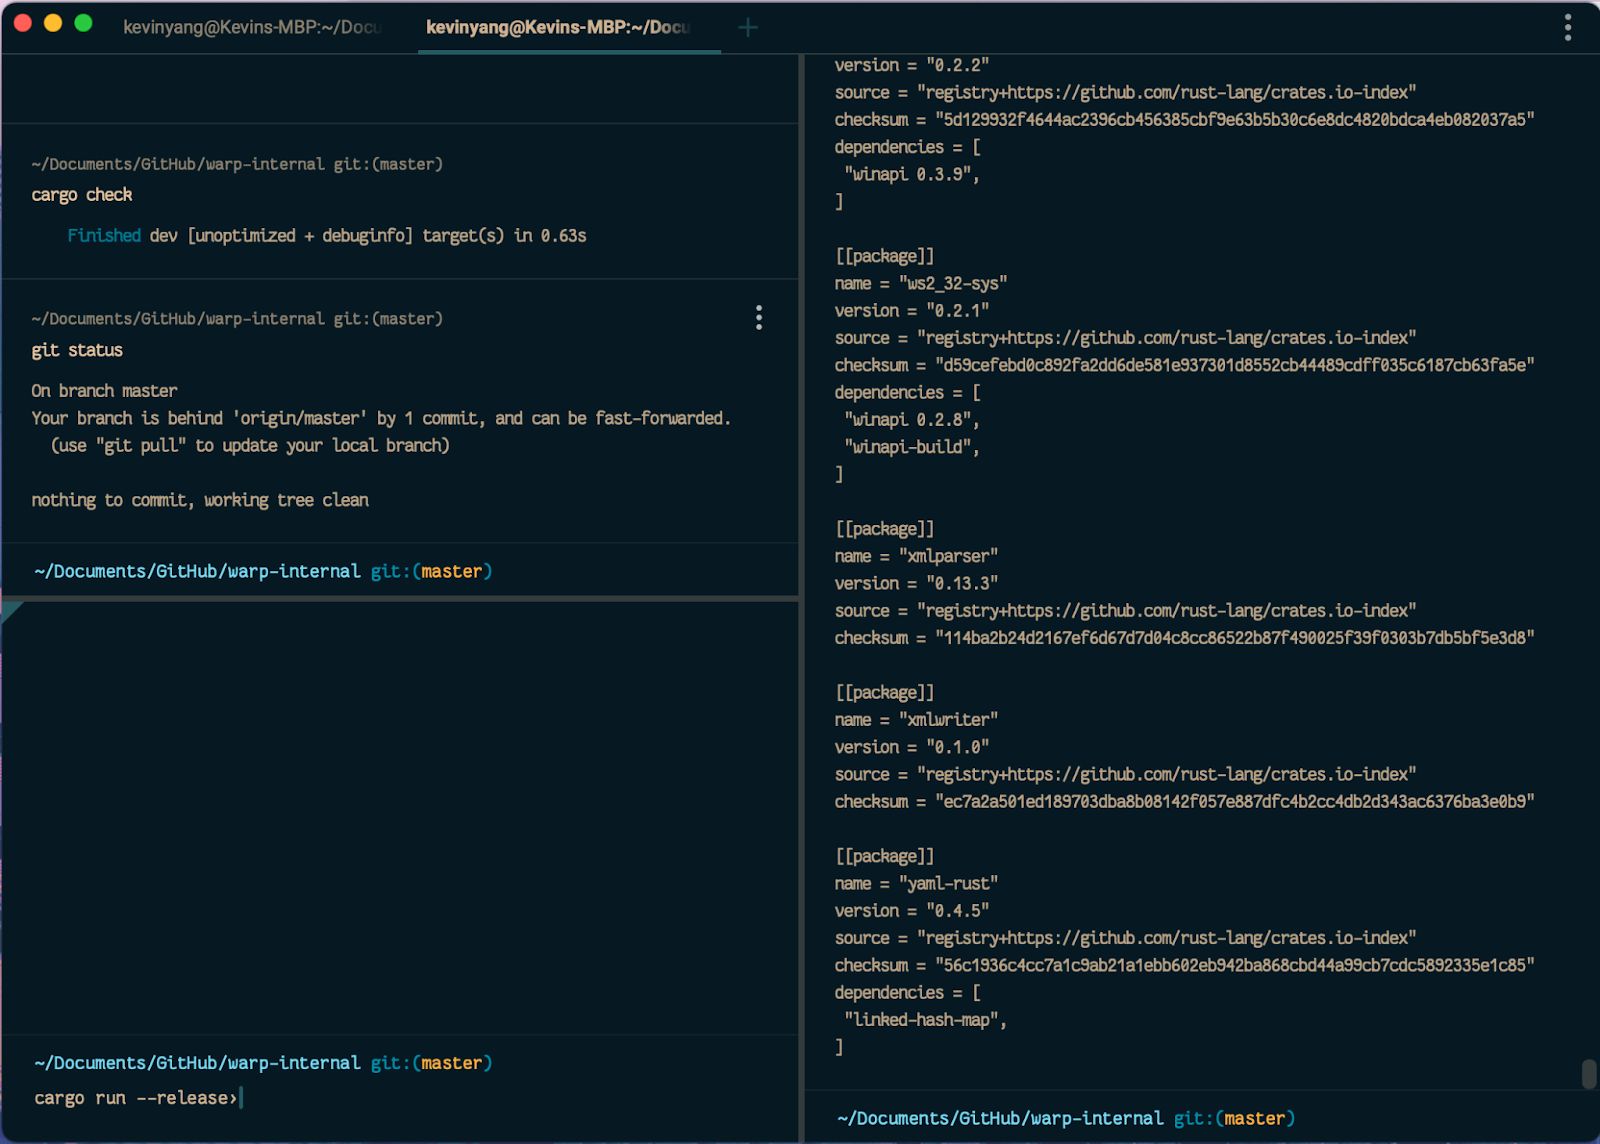
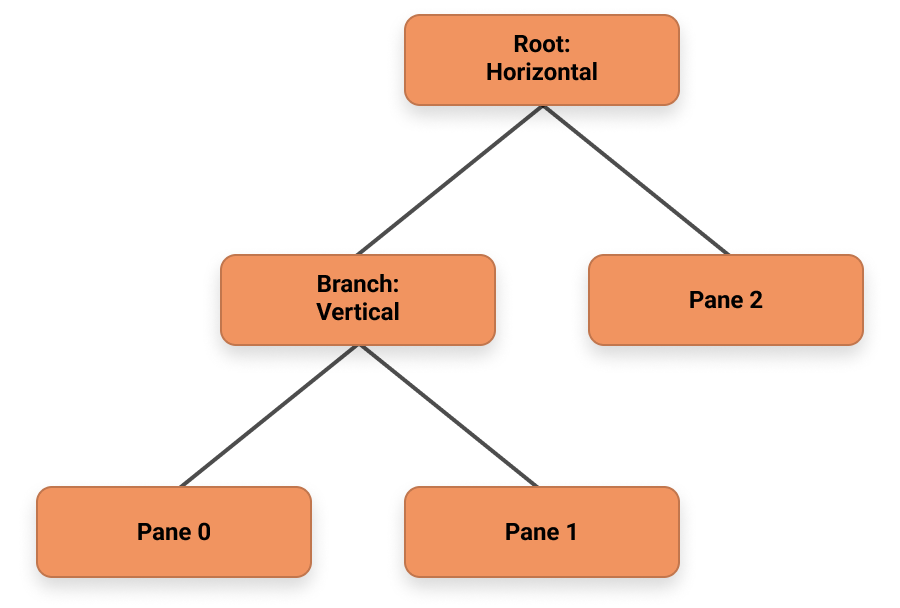
The way we define pane trees and their components in Warp looks like the following:
| Node { | |
| BranchNode, | |
| PaneNode, | |
| } | |
| Direction { | |
| Horizontal, | |
| Vertical | |
| } | |
| BranchNode { | |
| split_direction Direction, | |
| children Node[], | |
| } | |
| PaneNode { | |
| id, | |
| } |
How to Add and Remove Panes?
After we settled on trees as the data structure, we had to figure out how to modify these trees to add and remove panes.
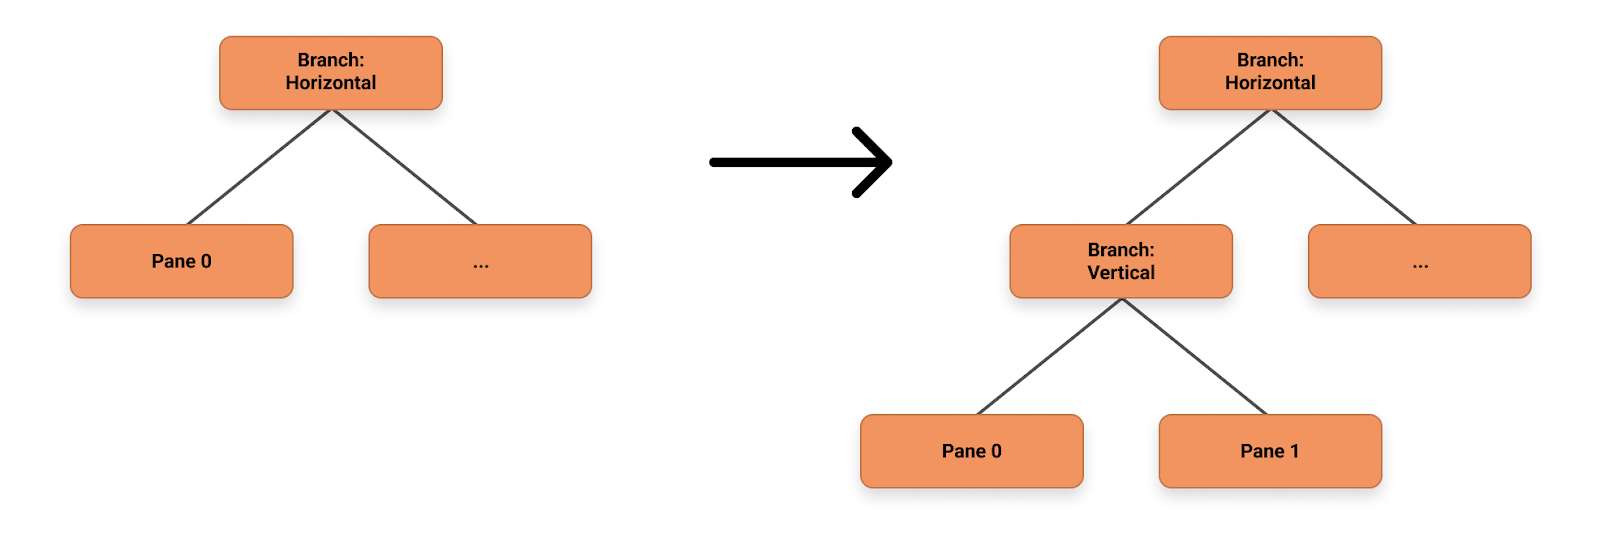
For adding panes, we could consider it as “splitting” the current pane node into a branch with two child nodes. For example, in the simple case when user hits split horizontally on a single pane, the tree before and after the action would look like the following:

Figure 3: Change of tree state when adding a new pane
What about panes that are nested under other branches? This becomes more complicated as we could have two different scenarios: splitting in the same direction and splitting in a different direction as the parent branch.

Splitting in the same direction
Splitting in a different direction
The algorithm we use here is to recursively traverse down the tree until we locate the deepest branch that hosts the current pane (depth-first search). In case the branch’s split direction is the same as the new pane’s split direction, we simply insert a new pane node into the children vector. When the split direction is different, we instead replace the pane node with a new branch node that has the new split direction and the current and new added panes as its children.
Removing panes is very similar to the reverse of adding panes. There’s one special case we need to keep in mind – if a branch node has only one pane node, we should collapse them into one pane node as there is no longer a “split”. Thus the algorithm should keep track of the branch’s children size after removing the target pane, once it’s below the size of two, we return the last pane node and the parent branch should replace the branch node with the returned pane node.
With regard to the performance of adding and removing panes, the run-time complexity should be O(N) where N is the number of nodes in the tree. The main source of algorithm runtime is from the depth-first algorithm used to locate the current pane. The memory complexity should be O(1) since we only need to change the target pane and its parent branch at most.
| /// Tree for all of the split panes | |
| /// | |
| /// Holds the root node. | |
| pub struct PaneData { | |
| pub root: PaneNode, | |
| } | |
| /// Single Node in the tree of panes. | |
| pub enum PaneNode { | |
| /// A collection of terminals split in a specific direction | |
| Branch(PaneBranch), | |
| /// A single terminal | |
| Leaf(EntityId), | |
| } | |
| /// The result of attempting to remove a pane from a branch | |
| enum BranchRemoveResult { | |
| /// The pane was not found in this sub-tree | |
| NotFound, | |
| /// The pane was found and removed, no further action is needed | |
| Removed, | |
| /// The pane was found and removed, leaving only a single node in the branch, so it needs to | |
| /// be collapsed into the parent | |
| Collapse(PaneNode), | |
| } | |
| pub struct PaneBranch { | |
| axis: SplitDirection, | |
| pub nodes: Vec<PaneNode>, | |
| } | |
| impl PaneData { | |
| pub fn split( | |
| &mut self, | |
| old_session_id: EntityId, | |
| new_session_id: EntityId, | |
| direction: SplitDirection, | |
| ) -> bool { | |
| self.root.split(old_session_id, new_session_id, direction) | |
| } | |
| pub fn remove(&mut self, session_id: EntityId) -> bool { | |
| self.root.remove(session_id) | |
| } | |
| } | |
| impl PaneNode { | |
| fn split( | |
| &mut self, | |
| old_session: EntityId, | |
| new_session: EntityId, | |
| direction: SplitDirection, | |
| ) -> bool { | |
| match self { | |
| PaneNode::Leaf(session) => { | |
| if *session == old_session { | |
| *self = PaneNode::Branch(PaneBranch::new(old_session, new_session, direction)); | |
| true | |
| } else { | |
| false | |
| } | |
| } | |
| PaneNode::Branch(branch) => branch.split(old_session, new_session, direction), | |
| } | |
| } | |
| fn remove(&mut self, session_id: EntityId) -> bool { | |
| match self { | |
| // Leaves can only be removed from the containing branch | |
| PaneNode::Leaf(_) => false, | |
| PaneNode::Branch(branch) => match branch.remove(session_id) { | |
| BranchRemoveResult::NotFound => false, | |
| BranchRemoveResult::Removed => true, | |
| BranchRemoveResult::Collapse(last_node) => { | |
| *self = last_node; | |
| true | |
| } | |
| }, | |
| } | |
| } | |
| } | |
| impl PaneBranch { | |
| fn new(old_session: EntityId, new_session: EntityId, axis: SplitDirection) -> Self { | |
| PaneBranch { | |
| axis, | |
| nodes: vec![PaneNode::Leaf(old_session),PaneNode::Leaf(new_session)], | |
| } | |
| } | |
| fn split( | |
| &mut self, | |
| old_session_id: EntityId, | |
| new_session_id: EntityId, | |
| direction: SplitDirection, | |
| ) -> bool { | |
| for (idx, (_, node)) in self.nodes.iter_mut().enumerate() { | |
| match node { | |
| PaneNode::Branch(branch) => { | |
| if branch.split(old_session_id, new_session_id, direction) { | |
| return true; | |
| } | |
| } | |
| PaneNode::Leaf(pane) => { | |
| if *pane == old_session_id { | |
| // If the split comes in the same direction as the previous splits | |
| // on this sub-tree, we can insert the new pane into the nodes directly | |
| if direction == self.axis { | |
| self.nodes.insert( | |
| idx + 1, | |
| PaneNode::Leaf(new_session_id), | |
| ); | |
| } else { | |
| // Otherwise, split the current leaf into a perpendicular branch | |
| *node = | |
| PaneNode::Branch(PaneBranch::new(*pane, new_session_id, direction)); | |
| } | |
| return true; | |
| } | |
| } | |
| } | |
| } | |
| false | |
| } | |
| fn remove(&mut self, session_id_to_remove: EntityId) -> BranchRemoveResult { | |
| for (idx, (_, node)) in self.nodes.iter_mut().enumerate() { | |
| match node { | |
| PaneNode::Branch(_) => { | |
| if node.remove(session_id_to_remove) { | |
| return BranchRemoveResult::Removed; | |
| } | |
| } | |
| PaneNode::Leaf(pane) => { | |
| if *pane == session_id_to_remove { | |
| self.nodes.remove(idx); | |
| if self.nodes.len() == 1 { | |
| // Safety: We know that there is an element in `self.nodes` | |
| return BranchRemoveResult::Collapse(self.nodes.pop().unwrap().1); | |
| } else { | |
| return BranchRemoveResult::Removed; | |
| } | |
| } | |
| } | |
| } | |
| } | |
| BranchRemoveResult::NotFound | |
| } | |
| } |
Navigating Panes with Arrow Keys
One challenge we encountered when creating split panes was supporting navigation with arrow keys in a way that mapped to the visual layout of the panes. Although visually the panes are organized in two dimensional space, the pane tree does not maintain the spatial knowledge of which panes are next to each other. Take the state below as an example: when the user hits the right key on the top left corner, in a two dimensional array representation, we might just increment the column index by 1 to get the top right pane. However, in a tree representation, we will need to first traverse up the tree until we find a branch with the same split direction as our navigation direction and then traverse down that subtree until we hit the target node.

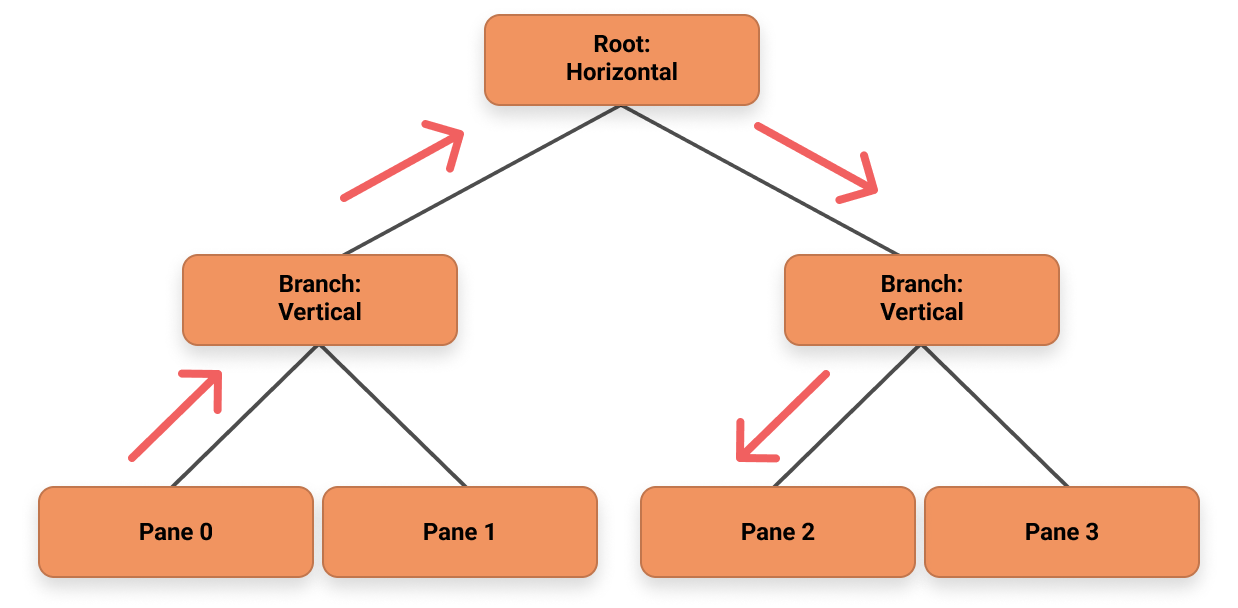
Figure 4: How navigation with arrow keys works in the tree structure.
Since multiple nodes could exist in the sub-tree, one heuristic we use to make the navigation experience more natural is to focus on the first child node if the navigation direction is right or down and focus on the last child node if the direction is left or up. In the end, the run-time complexity of navigation will also be O(N) as the depth-first search to locate the current pane is O(N) and traversing up to locate the target pane is O(N) as well.
| fn find_pane_by_direction( | |
| &self, | |
| session_id: EntityId, | |
| direction: Direction, | |
| ) -> FindPaneByDirectionResult { | |
| for (idx, (_, node)) in self.nodes.iter().enumerate() { | |
| let res = node.pane_by_direction(session_id, direction); | |
| match res { | |
| FindPaneByDirectionResult::Found(_) => return res, | |
| FindPaneByDirectionResult::Located => { | |
| // If the axis is different, we left for the parent branch to handle. | |
| if direction.axis() != self.axis { | |
| return res; | |
| } | |
| let target_pane_id = match direction { | |
| Direction::Left | Direction::Up => { | |
| if idx == 0 { | |
| return res; | |
| } | |
| self.nodes[idx - 1].1.last_pane() | |
| } | |
| Direction::Right | Direction::Down => { | |
| if idx == self.nodes.len() - 1 { | |
| return res; | |
| } | |
| self.nodes[idx + 1].1.first_pane() | |
| } | |
| }; | |
| if let Some(id) = target_pane_id { | |
| return FindPaneByDirectionResult::Found(id); | |
| } else { | |
| break; | |
| } | |
| } | |
| FindPaneByDirectionResult::NotFound => (), | |
| } | |
| } | |
| FindPaneByDirectionResult::NotFound | |
| } |
Representing Pane Sizes
Every pane should be resizable. Due to how all panes together occupy a space with set dimensions, resizing one pane will lead to the resizing of multiple other panes as well. For example, in the case where one screen is split into four equal panes, dragging the border in the center will actually cause all four panes to be resized as shown below.

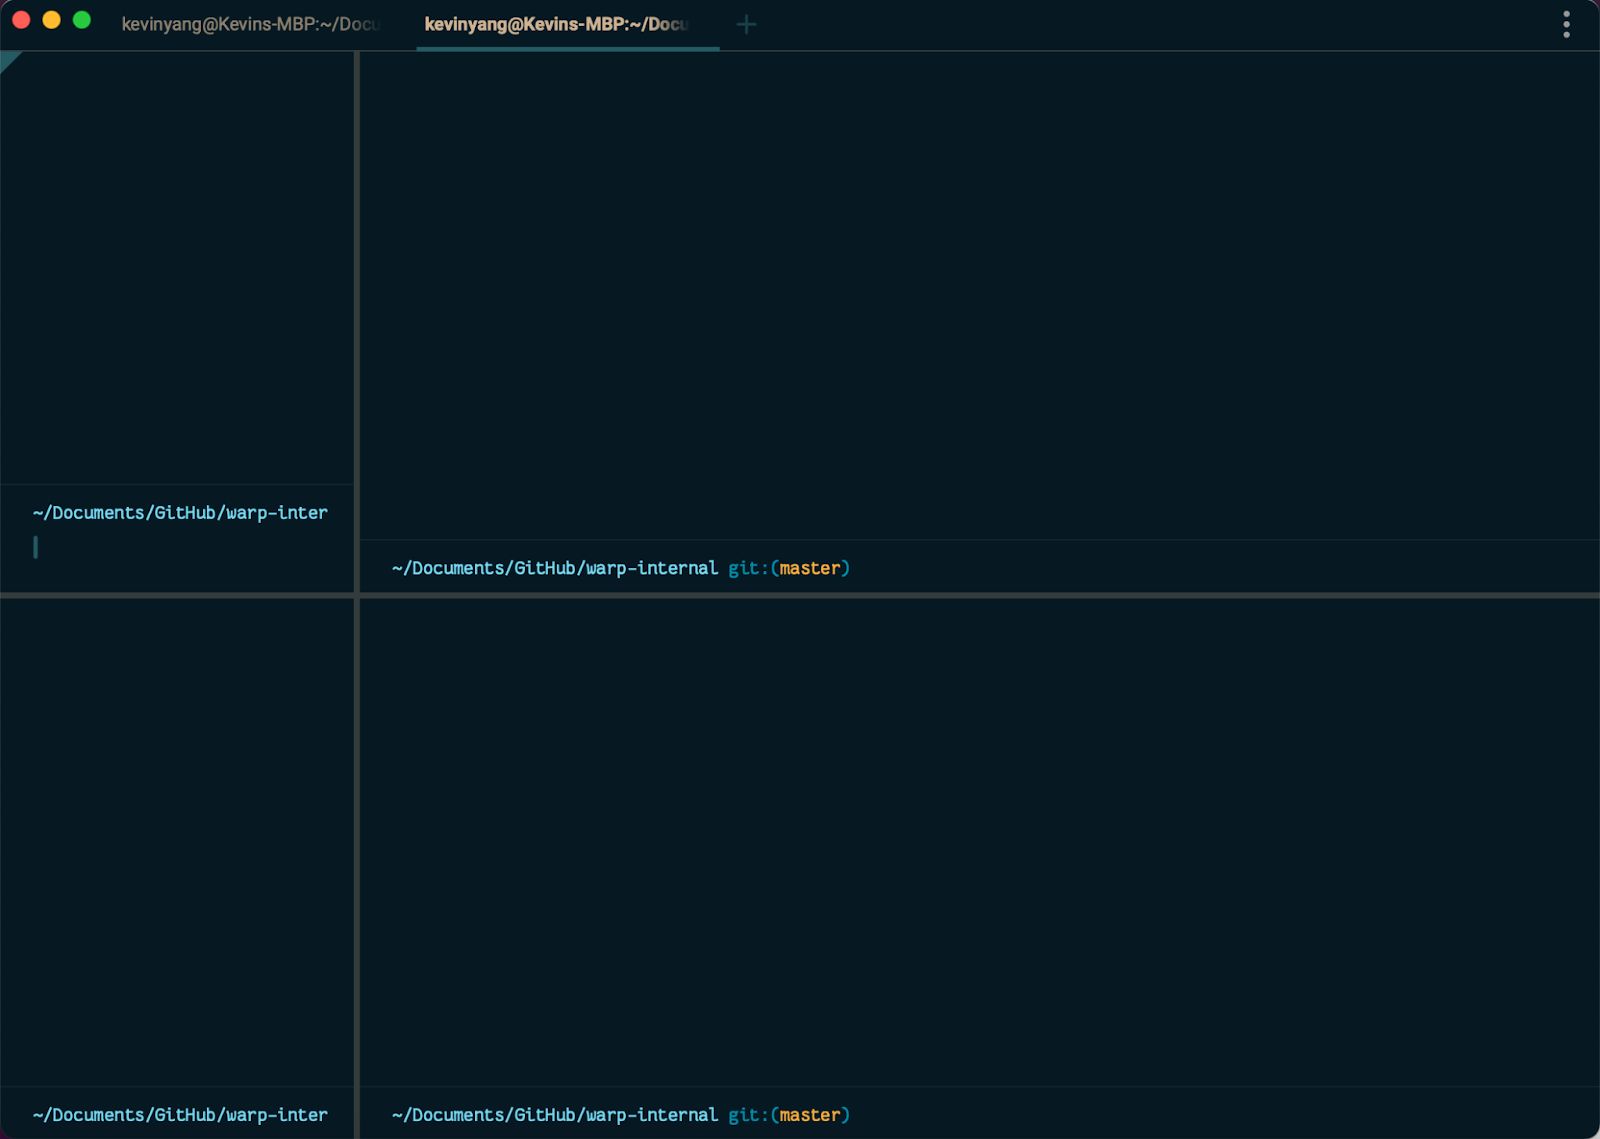
Figure 5: Resizing one pane could lead to multiple other panes to resize as well
With this ripple effect of individual pane sizes, saving the absolute pane size in each node is undesirable as we will need to recalculate all sizes on each resize call. Thus, we decided to save the ratio each child node takes of the branch node’s size instead (we call it the flex ratio). When rendering, we pass in the available size from the root node and go down the branches, deriving each individual pane size based on the split direction and the flex ratio in the branch node. If you want to know more about how Warp renders on the GPU with its native UI framework, check out our blog post here!
The new BranchNode will look like:
| BranchNode { | |
| split_direction Direction, | |
| flex_ratio f32[], # this should add up to 1.0 | |
| children Node[], | |
| } |
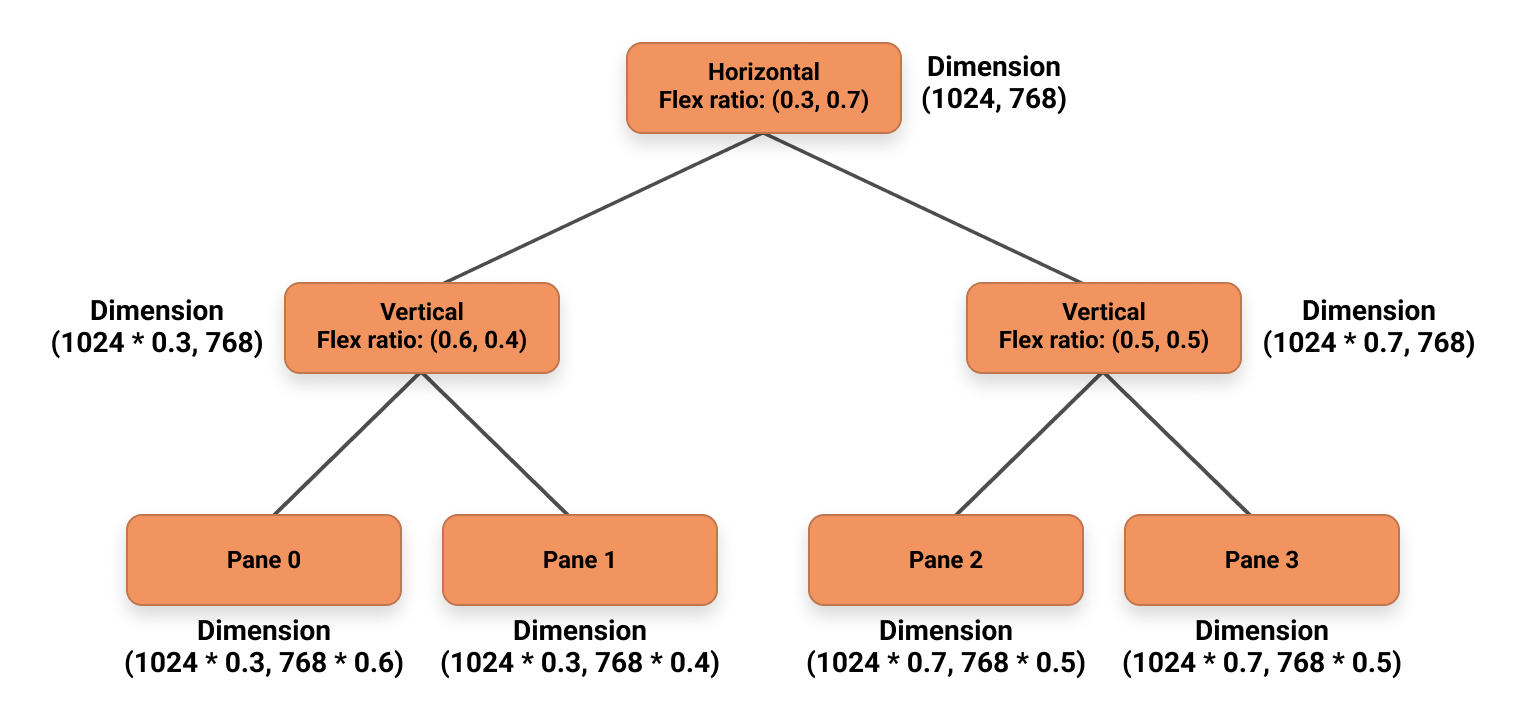
Figure 6: An example of how we derive the absolute size for each pane using the flex ratio, assuming we start with a screen with dimension 1024 by 768 and the pane is split into four panes. We could walk down from the root pane to first derive the dimensions of the branch nodes and then use that information to calculate the absolute size of each individual pane.
Summary
Personally, I’m a big fan of how the simple split pane UI makes the terminal so much more powerful. It’s been really exciting to work on designing and programming the split pane functionality within Warp myself. Although there are still many remaining features yet to be implemented that are available in iTerm and Tmux (drag and drop panes!), having a native implementation of the split pane unlocks many more possible things we could do in Warp to make the developer experience even better.
Request early access and let us know what we could make to further improve split panes in Warp!


