How To Create a Git Repository

Philip Wilkinson
Software Engineer, Amazon
Published: 11/30/2023
Quick reference to setup a repository
$ cd my-project
# initialise a git repository
$ git init
# Add all files to be tracked
$ git add .
# commit tracked files with a message
$ git commit -m “some message”
# configure a remote
$ git remote add origin <remote_url>
# push to a remote repository
$ git push --set-upstream origin main
To get started with git, you need to make sure you have it installed on your computer. You can download it from the official website and follow the instructions there to install it.
Create a new repository locally
To then create a new repository you need to first create a directory or folder for your project. In the command line with can be done using the mkdir command followed by the name of the folder you want to create:
$ mkdir
You can then navigate into that folder using the command line cd command. This allows you to change directories:
$ cd
Once you are in that directory a git repository can be initialised using the git init command. This will be:
$ git init
This will create a new repository based on the folder you are currently in. A .git folder should appear in the directory. Note: .git will initially be hidden; you can use the ls -a command to show all hidden files in a directory.
This will mean you have a git repository for your project and can start making branches and tracking changes on files you’ve added using git add and git commit.
Create a repository in an existing folder
If instead you already have folder that you have created you can navigate to that directory:
$ cd
Then use the git init command as before:
$ git init
If you then want to make sure that the repository is tracking your files you first need to use the git add command to add them to the repository. To add all the current files and folders you use:
$ git add .
After adding the files you then need to commit the changes to the repository. This is similar to taking a snapshot of your repository at a particular point in time. To commit changes use the command:
$ git commit -m “Initial commit”
For this, replace “initial commit” with a meaningful commit message that would describe the changes that you have made or the state of the current repository.
Connect to a remote repository
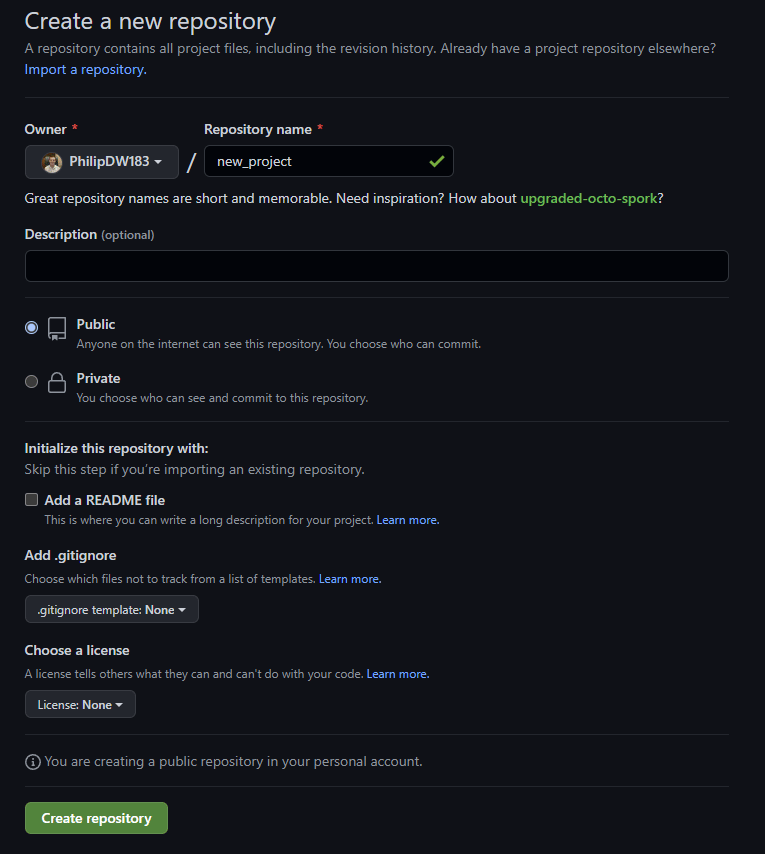
First you need to make a remote repository. To do this, we’ll use GitHub as an example, but other remote repository options like GitLab and BitBucket would work similarly. On GitHub, create a new empty repository. Give it a name and set whether you want to make it public or private. This should look something like this:

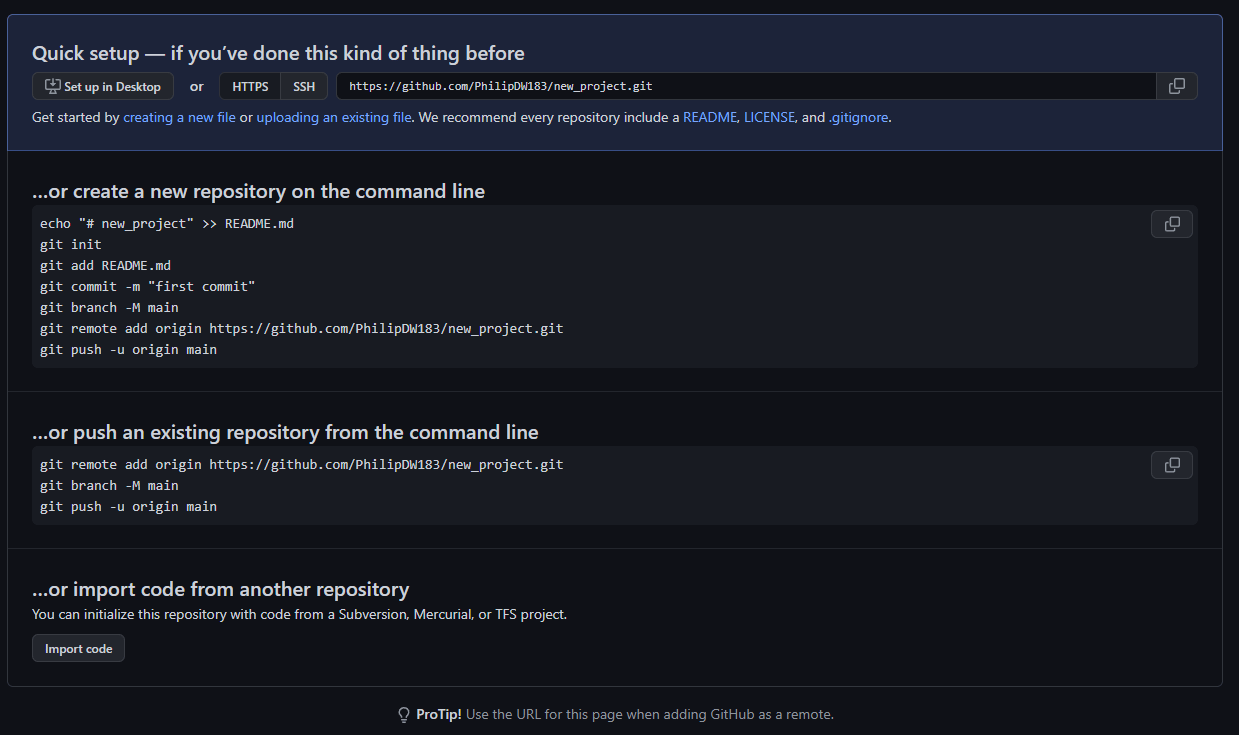
And the new repository should look something like this:

You can then link your local repository to the remote one using the command:
$ git remote add origin <remote_url>
Where the remote url is found on your remote repository. This will often take the form of [email protected]:<your_username>/<your_repo_name>.git. This will then connect your local repository to your remote one. You can verify that this connection has been made using the command:
$ git remote -v
Which should print the remote URL that was specified.
When pushing your work to the new remote repository you need to then set up where exactly you want to push to. This can be done using the command:
$ git remote --set-upstream origin main
This command creates a branch named main in our remote repository (if it doesn’t exist) and sets our local main branch to track and send changes to this remote branch. To then push your changes to the remote repository, you use the command:
$ git push origin main
In the case of an older repository, where the default primary branch may be named master instead of main, the command would be:
$ git push origin master
Written by

Philip Wilkinson
Software Engineer, Amazon
Filed Under
Related Articles
Undo A Git Pull
How to effectively remove the commits introduced by a pull in Git using git-reset and preserve your local changes using git-stash. Also, how to cancel an unmerged pull request on GitHub.

Undo a Git Merge
How to rollback the changes introduced by a merge in Git by adding new opposite commits using git-revert and effectively removing commits using git-reset.

Prompt Show Git Branch In Prompt
Enhance your terminal with a custom Git prompt. Learn different ways to integrate this contextual info, from custom shell functions to Warp context chips and toolkits like Starship and P10K.

How To Remove Secrets From The Git History Remove Secrets From The Git History
Learn how to remove secrets from the Git history using the BFG and git-filter-repo command-line tools.

Adding a Submodule in Git
This post will show you how to simply add a submodule to a local repository, clone a repository with a submodule, and work within a repository that has a submodule.

Undo a git push
This post will show you had to simply undo a git push three different ways.

Undo Git Add
Learn how to effectively use 'git add' to stage files in Git for committing, and discover two powerful methods to undo accidental stagings.

Undo a Git Rebase
This post will show you how to undo a rebase using git reset, git rebase and git revert

Git Push Origin
A breakdown of git push origin

Create Folder In GitHub Repository
Learn how to create and push one or more empty directories in a Git repository using `.placeholder` and `README.md` files using both the CLI and the GitHub interface.

Git Push Tags
This post will show you how to push a single tag, multiple tags, all tags, and tags with commits.

Undoing Git Commits
Explore ways to undo a commit, including git reset, git checkout, and git revert with git while preserving commit history.

