Route work with triage and specs
What we’ll cover
Add triage and spec stages to your blueprint so the factory asks clarifying questions before building ambiguous features.
In the last lesson, we got a backlog of issues flowing through the factory. This is a time-save for issues that are well defined, but what about issues that are less well-defined? Let's look at this issue that adds an expand / collapse toggle for folders in the sidebar:
After digging through a deep folder tree, the sidebar is left with lots of open branches, and getting back to a compact overview means closing each folder one at a time. Going the other way is just as slow when I want to scan everything.
It would be great to have a way to expand or collapse all folders at once.
The user problem is well-defined, but the implementation is not. I would ask:
- Do we want to add this new affordance in the product?
- If so, where should this toggle button be placed? A new button in the sidebar, a right-click option on a folder, the "View" menu in the macOS menu bar...?
- What should happen for the folder containing a file I have open? Should it close as well, or stay open to keep showing what I have focused?
Agents are pretty good at taking a "best guess" at questions like this, but the more questions you have, the more likely it is to get it wrong. This leads to a "slop cannon:" agents pumping out changes without any human judgment.
For reference, here's a sample of what our builder generated when given this issue:
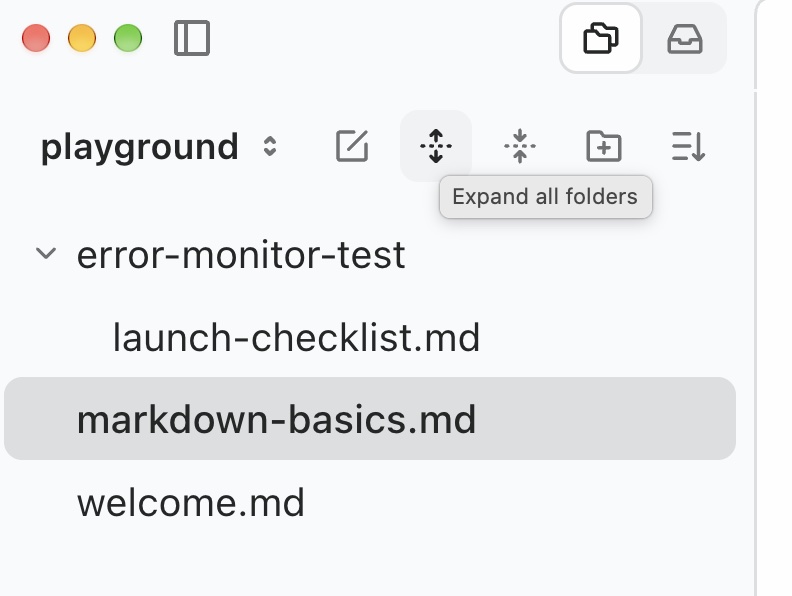
Personally, I'd prefer the builder use a single button for this flow, or move the option to a quieter place like the application's menubar.
To allow for this, we need a "human gate" where we encourage the builder to ask us questions, and perhaps generate an implementation plan when there's ambiguity.
Adding stages for triage and speccing
Let's update our factory to include two new stages ahead of implementation: triage and spec writing.
Prompt
You send a request from factory chat, or label an issue factory. Either way, the task now starts at triage.
Triage will serve as the router. It'll research each request and measure the ambiguity.
- If the change is well-defined, it'll route to implementation as normal.
- Otherwise, it'll proceed to a spec writing stage.
Spec will give the builder a space to ask the user questions about the feature and align on a spec document together. This document will include both the behavior of the change (aka the product experience) as well as the technical architecture of the change. We'll provide an example template for spec documents that you're free to tweak.
Update the blueprint
Let's head back to
factory.yamland addtriageandspecto our blueprint:- Instead of starting at
implement,startnow hands off totriage. triagetakes the user'srequestand outputs four fields: thegoal(whether the user is asking a question or trying to make a change), the trackingissueandcomplexity, andspec(whether we need to plan out the approach with a human).- Using the
tofield, the worker decides which branch to take based on plain-languagewhenconditions: if the change is clear (like adding YAML support to code blocks in Lesson 1), it goes straight toimplement; if it has open product decisions, it routes tospec. spectakes the request, asks the user clarifying questions, and opens a draft PR with a spec document. Notice howspecloops back to itself whenever you give feedback, creating a human gate that only advances toimplementonce you approve.
factory.yaml+35−2 blueprint: worker: foreman start: to: implement to: triage stages: triage: worker: builder inputs: |- request: the requester's ask in its exact words, with links and attachments. outputs: |- goal: answer, change, or unclear. issue: the issue URL, or the decision that the work needs no issue. complexity: the assessed size, and any behavior choices left open. spec: whether a spec is needed, and why. prompt: file: stages/triage.md to: - stage: spec when: A spec is needed, or the requester asked for one. - stage: implement when: The goal is a change, and no spec is needed. - stage: handoff when: Otherwise. The request was answer-only, or is unclear and waiting on the requester. spec: worker: builder inputs: |- request: the requester's ask in its exact words, with links and attachments. outputs: |- spec_pr: the draft pull request holding the committed spec. decisions: the choices the requester made, and the assumptions recorded. prompt: file: stages/spec.md to: - stage: implement when: The requester approved the spec. - stage: spec when: The requester gave feedback on the spec. Revise it on the same branch and pull request. implement: worker: builder inputs: |- request: the requester's ask in its exact words, with links and attachments. triage: the triage outputs, with the request they came from. spec: the approved spec pull request, when there is one. outputs: |- pr: the pull request that was opened or updated.- Instead of starting at
Add the triage prompt
Next, let's add the prompt files referenced by those new stages. First, create
stages/triage.md. This defines what a good issue description looks like when tracking work, and what counts as product ambiguity so the worker knows when to hand off tospec:stages/triage.md # Triage Classify the goal: an answer, a requested change, or unclear. For a change, research it, assess its complexity, and find or create the tracking issue. Recommend a spec when the change is a new feature, touches several areas, or leaves behavior choices open. For an answer, the evidence-backed answer is the deliverable. 1. Research. Read the request and the attached material. Read the applicable code. Make sure that you understand what is asked and where the problem or the change is. If you cannot clearly identify the problem, ask the foreman to obtain more information. 2. Depending on the type of request, you may need to: - For a bug report: if the research in step 1 identifies the cause, a reproduction is not necessary. If the cause is not clear from the research, reproduce the bug if you can. - For a feature request: identify the requirements. - For a question: return the evidence-backed answer to the foreman; do not turn it into an implementation plan. Track the underlying problem only if it deserves an issue. 3. Issue decision. Decide if the work needs an issue. If the work is too small to track, skip the issue, note that, and end the stage; the conversation is the record. 4. Find or create the issue. If the request came from an issue, adopt it. Otherwise search for an existing issue that tracks the same work, and adopt a clear match. If the request is a follow-up to work already in progress (an open factory PR, or an issue already moving through the factory), adopt that work instead of creating a parallel issue. If there is no clear match, create a new issue. Keep the issue URL at hand; every later stage needs it. 5. For a new issue, follow the issue content template below. For an adopted issue, add what you learned as a comment. Use the `gh` CLI for GitHub issues: `gh issue list --search` to find existing work, `gh issue create` to file an issue, and `gh issue comment` to record your findings on one. ## Issue content Write a clear, concise title that describes the work. For the issue description, adopt the style of existing issues if there is a consistent one. Otherwise, use this template, omitting sections that do not apply: ## Description What is wrong or what is asked, and where. Human-readable. ## Reproduction The reproduction steps and proof: the output of the failed test, the incorrect response, or the visual proof. When research identified the cause without a reproduction, the explanation and the evidence instead. ## Acceptance criteria The checks that show that the work is complete. ## Candidate approaches The approaches you considered, each with its trade-off, and the one you recommend and why. This is input to the next steps, not a decision. ## References Specific code locations, test results, error output, and applicable links. The References section is important: without it, the later stages have to collect this context again, which is slow and costly. ## Complexity, ambiguity, and choices - Report the complexity as a t-shirt size: - XS or S: the change is local and obvious, with low risk. - M: the change touches multiple files, with bounded uncertainty. - L or XL: the change is cross-cutting, has risk, or is a full feature. - Tell three kinds of uncertainty apart, and report each in its own place: - Facts that research can settle (where the bug is, what the code does today, which callers are affected) are not ambiguity. Settle them and record the evidence. - Behavior choices (more than one behavior is reasonable, or the request leaves out important requirements) are ambiguity. Report them. - Approach choices (more than one reasonable way to do the work, with trade-offs a user would care about) go in the candidate approaches. - Do not invent ambiguity where the request is clear, and do not hide a real choice by picking for the user. Both are errors; the second is the more expensive one.Add the spec prompt
Now create
stages/spec.mdto define how the worker interviews us and what the spec document should look like.This format is totally up to you; you can tweak the template however you like, or even encourage the worker to generate HTML prototypes or diagrams. To keep things portable and easy to read, we'll use a Markdown file (
specs/<short-name>.md) that summarizes the expected behavior, product decisions, assumptions, and technical design:stages/spec.md # Spec A spec settles the decisions a builder would otherwise guess at. You write the spec; you do not implement it. 1. Read the request, its issue if it has one, and the code it touches. Do not ask what the request already answers. 2. Interview the requester through the foreman. Batch every open question into one round: the main workflow, the edge cases that matter, what is out of scope, and existing patterns to follow. Push back on vague answers. Ask a second round only for questions the answers raised. 3. Write the spec to specs/<short-name>.md with the template below. Keep it short, prefer lists, and mark every choice you made without an answer as an assumption. 4. Commit it on a new branch and open a draft pull request. If the request has an issue, link the pull request on it. 5. Send the pull request to the foreman for approval, and stop. To revise, edit the same file on the same branch, then ask again. ## Template # <Title> ## Summary What is being built, and why. One short paragraph. ## Behavior Numbered, testable behaviors, with edge cases. ## Technical design The files and functions to change, and the shape of the change. ## Decisions Each real choice: the options, and why the winner won. ## Assumptions Choices made without an answer from the requester. ## Out of scope What this change will not do. ## Validation How to prove each behavior works: a test, a command, or a screen recording. Never start implementation before the requester approves the spec in writing.Update the implement prompt
The last change we'll make in our factory definition is inside
stages/implement.md. We'll instruct the builder to commit its code directly onto the branch and draft pull request created during the spec stage:stages/implement.md+2 # Implement Implement the change as described, and use static checks to verify your work. Skip computer use verification. When there is an approved spec, implement it on the spec's branch and pull request; its validation section is your checklist. Link the pull request on the issue.Save your factory configuration and check the Blueprint tab to see your new
triageandspecstages wired up.Re-run the sidebar folders issue
Now let's have the factory take a second stab at the expand/collapse sidebar folders issue using our new blueprint.
First, close the pull request the builder opened for Expand or collapse all sidebar folders in the last lesson. Then head to New Chat and prompt the factory to re-triage the issue from scratch. Since the worker is smart enough to look for existing workstreams, asking it to re-triage gives us a clean run:
Prompt Re-triage this issue from scratch: <URL of your "Expand or collapse all sidebar folders" issue>This time,
triagespots the open product decisions and routes the task tospec. Instead of guessing, the worker comes back with a batch of clarifying questions, each with a recommended answer. Here are a few from our run:Surface: Where should "expand all / collapse all" live?
Scope: Should it apply to every folder in the sidebar, or only the chosen folder and its descendants?
Open file: After "collapse all", what happens to the branch containing the currently open file?
That last one is an edge case we hadn't thought about when writing the GitHub issue. We answered: put it in the View menu, apply it to every folder, and keep the open file's folder expanded.
Review and approve the spec
Once you reply with your answers, the worker hands back a draft pull request containing the spec document. If we check the Behavior and Decisions sections of the spec, we can see our choices encoded.
When you're happy with the spec, reply in chat to approve it. The builder will then layer the implementation onto that same PR. If you check out the branch locally and run the desktop app, you should see a version of the UI that matches your spec. In our example, we told the agent to implement the expand / collapse menu using the View menubar item on macOS:
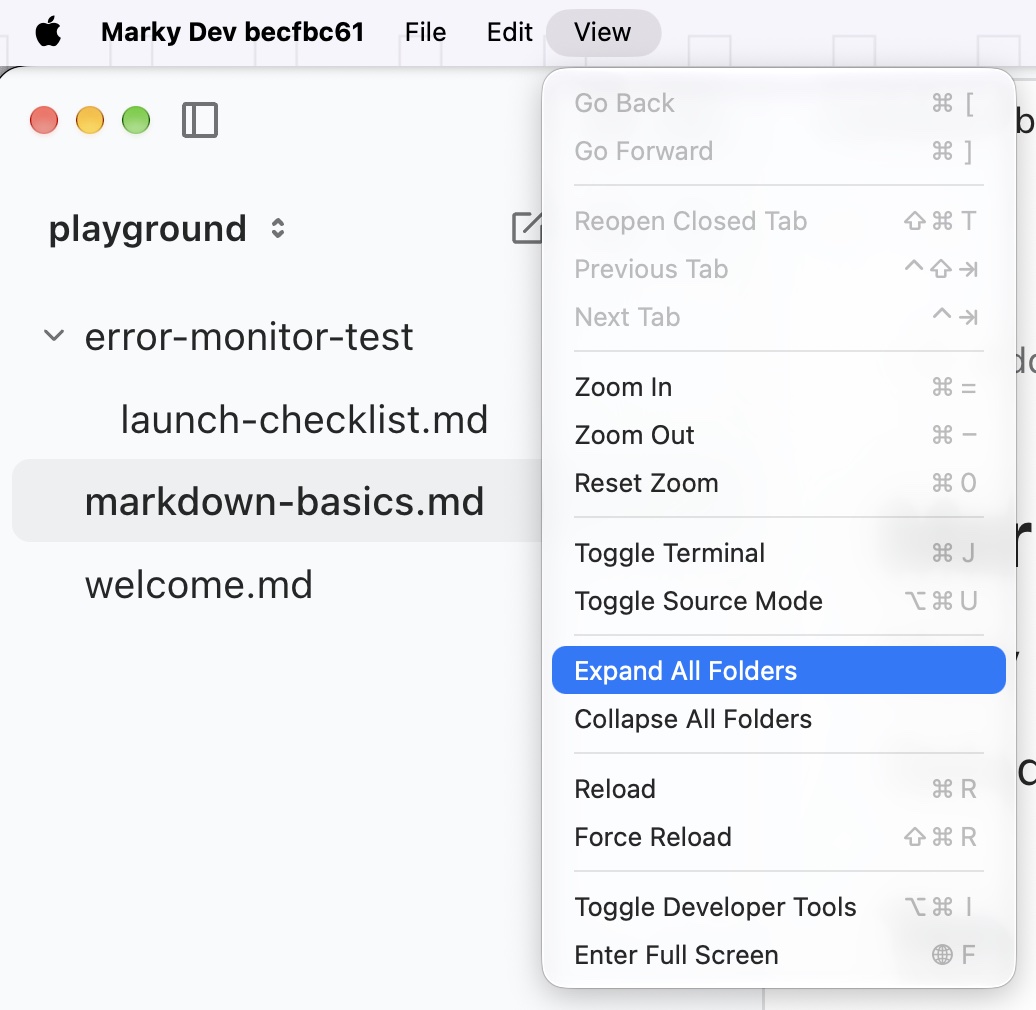
The implementation follows the spec: expand and collapse live in the View menu.
- factory.yamltriage and spec stages added
- workers/foreman/worker.md
- workers/builder/worker.md
- automations/github-issues/automation.md
- stages/implement.mdspec branch handling added
- stages/triage.mdnew
- stages/spec.mdnew
Getting the builder to ask questions first is a big step forward, but we still had to clone the branch down to our laptop and boot the app manually to check that our new menu item worked. If we're going to trust workers to tackle more issues, we need to give them a computer to click around the applications they've built. That brings us to verification and risk assessment.